Images and Functions
Image
loadImage()
To load an image into p5.js, we need to use the loadImage() function.
Begin by uploading your image file to your p5.js sketch.
I’ll be using this image named rainbow.png. This image was sourced from the Public Domain Image Archive and edited to be 400 by 400 pixels.

After the image has been uploaded, use async, await and loadImage() function to load in your image.
let img;

async function setup() {
  createCanvas(400, 400);
  img = await loadImage("rainbow.png");
}
image()
To draw an image to our screen, we can use the image() function. The image() function in p5.js allows for a lot of customization through its many parameters. We’ll be focusing on the first five parameters.
image(img, x, y, width, height)
img= image to displayx= x position to draw image (top left corner by default)y= y position to draw image (top right corner by default)width= width to draw imageheight= height to draw image
image(img, 0, 0, 100, 100);
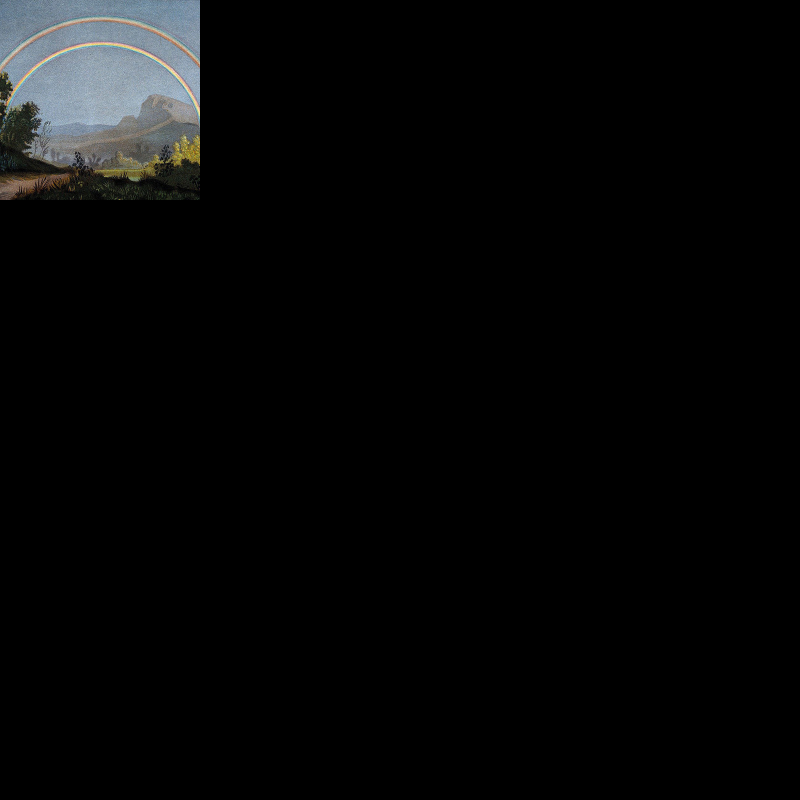
let img;

async function setup() {
  createCanvas(400, 400);
  img = await loadImage("rainbow.png");
}

function draw() {
  background(0);
  image(img, 0, 0, 100, 100);
}
img.width and img.height
We can also size our image based on our image’s width and height by calling .width and .height.
image(img, 0, 0, img.width, img.height);
let img;

async function setup() {
  createCanvas(400, 400);
  img = await loadImage("rainbow.png");
}


function draw() {
  background(0);
  image(img, 0, 0, img.width, img.height);
}
imageMode()
Similar to rectMode(), we can use imageMode() with the parameter of CENTER or CORNER to change where our image is drawn from.
Example:
Using imageMode(CENTER) will place the center of our image on the provided x and y parameters.
 imageMode(CENTER);
 image(img, width / 2, height / 2, 200, 200);
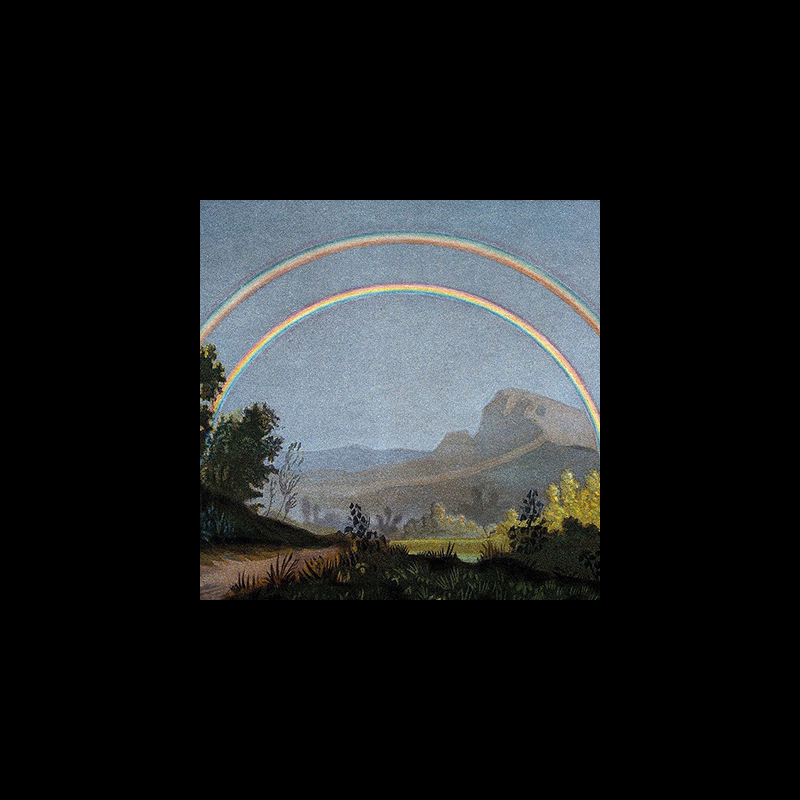
let img;

async function setup() {
  createCanvas(400, 400);
  img = await loadImage("rainbow.png");
}

function draw() {
  background(0);
  imageMode(CENTER);
  image(img, width / 2, height / 2, 200, 200);
}
Functions
Throughout our time of using p5.js thus far, we have been writing and calling functions.
We have been calling functions such as:
circle(200,200,50);
or
rectMode(CENTER);
We also have been writing p5.js defined functions such as:
function setup(){

}
or
function draw(){

}
When using p5.js and JavaScript, or other programming languages, we can also write our own functions. Why would we write our own functions if we can just write our code in preexisting functions within the p5.js library such as draw(), setup(), or mousePressed()?
There are two main reasons for creating your own functions in programming: Modularity and Reusability
- Modularity: functions allow us to separate parts of code so that we can keep our code more organized, and, as our programs get more complex, have a clearer understanding of what each part of our code is doing.
- Reusability: functions also allow us to make code that we write reusable. We can see this in the p5.js library in which we can reuse the function of circle() over and over again to get different results. We can also make our own functions that are modular to reuse code that we have written in different parts of our sketch.
Modularity and Defining Functions
To define a function:
- Use the keyword
function - Name your function (typically camelCase)
- Open and closed parentheses
() - Open and close curly brackets
{} - Write the code of your function
Example:
A function named button
function button(){

}
One of the main uses of functions is modularity, or, in other words, separating out code into its own functions to make our code both modular and more readable.
For example, let’s say I have this code that draws an image, and places a button on that image I need to mouse over.
let img;

async function setup() {
  createCanvas(400, 400);
  img = await loadImage("rainbow.png");
}

function draw() {
  background(255);

  image(img, 0, 0, img.width, img.height);

  let x = 50;
  let y = 50;
  let radius = 40;

  if (dist(x, y, mouseX, mouseY) < radius) {
    fill(255);
  } else {
    fill(0);
  }

  circle(x, y, radius * 2);
}
With this sketch, I can isolate all the code that handles drawing the button and separate it into the button() function I created earlier.
function button() {
  let x = 50;
  let y = 50;
  let radius = 40;

  if (dist(x, y, mouseX, mouseY) < radius) {
    fill(255);
  } else {
    fill(0);
  }

  circle(x, y, radius * 2);
}
Lastly, within my draw() function, I can call the function I created:
draw(){
   button();
}
let img;

async function setup() {
  createCanvas(400, 400);
  img = await loadImage("rainbow.png");
}

function draw() {
  background(255);

  image(img, 0, 0, img.width, img.height);

  button();
}

function button() {
  let x = 50;
  let y = 50;
  let radius = 40;

  if (dist(x, y, mouseX, mouseY) < radius) {
    fill(255);
  } else {
    fill(0);
  }

  circle(x, y, radius * 2);
}
Reusability and Parameters
While modularity allows us to separate parts of our code into different functions, by focusing also on reusability, we can make the functions we create reusable. To make functions reusable, we need to give our function parameter definitions. We have already been using parameters so far in the course for example when we call circle(200,200,50). 200,200, and 50 are parameters that we provide to the circle() function that create different results.
When we define our own functions, we can also create our own parameters that control how the function operates.
For example, if I wanted my button() parameters to draw different buttons with different sizes at different positions, I can turn those variables into parameters that I define when I call the function:
function button(radius, x, y){
}
Instead of using the the variables of x, y, and radius within my function, I can now define these parameters when I call the function in draw():
  button(20, 200, 300);
  button(30, 100, 50);
let img;

async function setup() {
  createCanvas(400, 400);
  img = await loadImage("rainbow.png");
}

function draw() {
  background(255);

  image(img, 0, 0, img.width, img.height);

  button(20, 200, 300);
  button(30, 100, 50);
}

function button(radius, x, y) {
  if (dist(x, y, mouseX, mouseY) < radius) {
    fill(255);
  } else {
    fill(0);
  }

  circle(x, y, radius * 2);
}
Returning values from functions
In addition to functions taking in values as parameters, functions can also return values. I can return values from a function by using the keyword return.
For example, I can have the button function return true or false depending on if the user is over the the button. To do this, I can first create a local variable named mouseOver to hold the value I want to return. Then, in my dist if statement, I can assign mouseOver either true or false. Lastly, I need to return my mouseOver by using the keyword return followed by my variable name.
function button(radius, x, y) {
  let mouseOver;

  if (dist(x, y, mouseX, mouseY) < radius) {
    fill(255);
    mouseOver = true;
  } else {
    fill(0);
    mouseOver = false;
  }
  circle(x, y, radius * 2);
  return mouseOver;
}
Since my buttons now return a true or false, I can use them within an if statement. In the below example, I can create a new variable for a background color, and then draw a transparent background based on whether or not the user hovers over a button:
let img;
let backgroundColor;

async function setup() {
  createCanvas(400, 400);
  img = await loadImage("rainbow.png");
  backgroundColor = color(0, 0);
}

function draw() {
  background(255);

  image(img, 0, 0, img.width, img.height);

  if (button(20, 200, 300) == true) {
    backgroundColor = color(255, 0, 0, 20);
  }
  if (button(30, 100, 50) == true) {
    backgroundColor = color(0, 255, 0, 20);
  }

  background(backgroundColor);
}

function button(radius, x, y) {
  let mouseOver;

  if (dist(x, y, mouseX, mouseY) < radius) {
    fill(255);
    mouseOver = true;
  } else {
    fill(0);
    mouseOver = false;
  }
  circle(x, y, radius * 2);
  return mouseOver;
}
mouseIsPressed
So far in this course we have used the mousePressed() function to detect if a mouse is pressed. We can also use the mouseIsPressed boolean variable to detect if the mouse is being pressed at any given moment.
For example, I can use the mouseIsPressed variable in my above sketch to detect when a button has been pressed. For this to work properly, it is best to have a global variable that detects if the mouse has been pressed. We can used this variable to make sure only one button is pressed at a time:
let img;
let backgroundColor;
let canClick = true

async function setup() {
  createCanvas(400, 400);
  img = await loadImage("rainbow.png");
  backgroundColor = color(0, 0);
}

function draw() {
  background(255);

  image(img, 0, 0, img.width, img.height);

  if (button(20, 200, 300) == true) {
    backgroundColor = color(255, 0, 0, 20);
  }
  if (button(30, 100, 50) == true) {
    backgroundColor = color(0, 255, 0, 20);
  }

  background(backgroundColor);
}

function button(radius, x, y) {
  let mouseOver;

  if (dist(x, y, mouseX, mouseY) < radius) {
    fill(255);
    mouseOver = true;
  } else {
    fill(0);
    mouseOver = false;
  }
  circle(x, y, radius * 2);

  if(mouseOver == true && canClick == true && mouseIsPressed == true){
    canClick = false;
    return true
  }

  if(mouseIsPressed == false){
    canClick = true;
  }

  return false;
}